前言
一直想自己搞个人博客,在上面记录一些自己的日常!如今,github提供了免费的域名和空间,用户可以通过username.github.io来设置自己的个人主页或博客,虽然是静态的,但是聊胜于无啊。利用github pages的特性,一开始我使用jekyll来构造整个博客静态网站,但是使用了一阵子发现有不小的局限性以及扩展性不强,于是迁移到了生态圈更大的hexo,套用了简洁美观的next主题。同时将username.github.io挂载在了自己的私人域名下wardlin.site
如今博客大体框架已经搭建好了,具备了首页、个人主页、分类、音乐播放等模板。其他的一些功能如评论、分享等会陆续更新……
如今以这篇日记简单记录一下整个过程,以备后用!
准备
- 操作系统:window10 64 bit
- nodejs v6.10.0
- Git v2.9.0
- github个人账户
搭建博客框架
hexo 安装
在安装好nodejs的同时,我们也安装了npm(nodejs的包管理工具)。npm的安装源可以换成淘宝NPM镜像,防止被’墙’。
npm install -g cnpm –registry=https://registry.npm.taobao.org
要想在gitbash中运行node和npm命令,node需要全局安装或者nodejs的path环境变量在系统盘下,如下图:
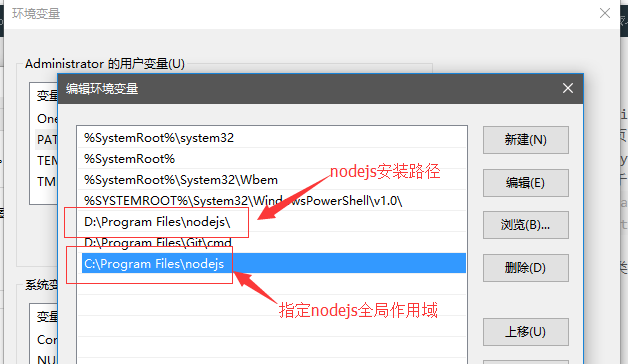
然后在d盘根目录下创建blog文件夹,右键’Git bash’打开操作界面,输入指令
$ cnpm install -g hexo-cli
再继续输入命令
$ cnpm install hexo –save
输入以下命令初始化blog文件夹结构(详细解读参考hexo建站)
$ npm install
成功后输入hexo -v就可以看到对应的版本号了!
本地运行hexo
初始化hexo
$ hexo init
运行hexo
$ hexo s -g
根据提示,在浏览器输入http://localhost:4000就可以看到博客的模型了
管理博客
配置信息_config.yml文件,以下统称站点配置文件
用编辑器打开blog/_config.yml文件,进行个人设置
1234567891011121314151617181920212223242526272829303132333435363738394041424344454647484950515253545556575859606162636465#博客名称title:#副标题subtitle:#简介,方便爬虫爬取博客信息(SEO)description:#博客作者author: username#博客语言(简体中文)language: zh-Hans#时区(默认和电脑的时区一致)timezone:#博客地址,与申请的GitHub一致url: http://username.github.ioroot: /#博客链接格式permalink: :year/:month/:day/:title/permalink_defaults:source_dir: sourcepublic_dir: publictag_dir: tagsarchive_dir: archivescategory_dir: categoriescode_dir: downloads/codei18n_dir: :langskip_render:new_post_name: :title.md # File name of new postsdefault_layout: posttitlecase: false # Transform title into titlecaseexternal_link: true # Open external links in new tabfilename_case: 0render_drafts: falsepost_asset_folder: falserelative_link: falsefuture: truehighlight:enable: trueline_number: trueauto_detect: truetab_replace:default_category: uncategorizedcategory_map:tag_map:#日期格式date_format: YYYY-MM-DDtime_format: HH:mm:ss#分页,每页文章数量per_page: 10pagination_dir: page#博客主题theme: landscape#发布到github.io库设置deploy:type: git#username改为你的github用户名repository: https://github.com/username/username.github.io.gitbranch: master写博客
$ hexo new ‘hello’
这会在blog/source/_post文件夹下生成hello.md,打开该文件就可以编辑了。markdown语法
123456789101112title: hellodate: 2015-07-01 22:37:23categories:- 日志- 二级目录tags:- hello---摘要:<!--more-->正文:所有的博文都保存在blog/source/_post文件下
本地预览新博文
生成静态文件(blog/public文件夹下)
$ hexo generate
命令可简写为
hexo g发表草稿
$ hexo publish [layout]
启动本地服务器
$ hexo server
命令可简写为
hexo s部署网站(这里用于提交博客信息到github上)
$ hexo deploy
命令可简写为
hexo d
创建github.io库
在自己的github上新建一个repository,命名为uesrname.github.io(username为你的github账号名)。然后在该仓库右边”setting”设置git pages为”Launch automatic page generator”。
在电脑上gitbash窗口使用 hexo d可以提交博客网站文件到github上。
绑定个人域名和github地址
- 购买私人域名
到阿里云上购买一个域名,进行实名认证 github.io库创建CNAME文件
到username.github.io仓库根目录下创建CNAME文件(文件名大写,无后缀),在该文件写上自己需要绑定的域名(不需要添加www),例子:1wardlin.site去域名提供商上设置域名解析
- 到阿里云上找到域名,点击’管理’,进行DNS修改,将DNS服务器修改为
f1g1ns1.dnspod.net和f1g1ns2.dnspod.net(dnspod是国内解析,速度更快) 点击’域名解析’,添加解析如下图:
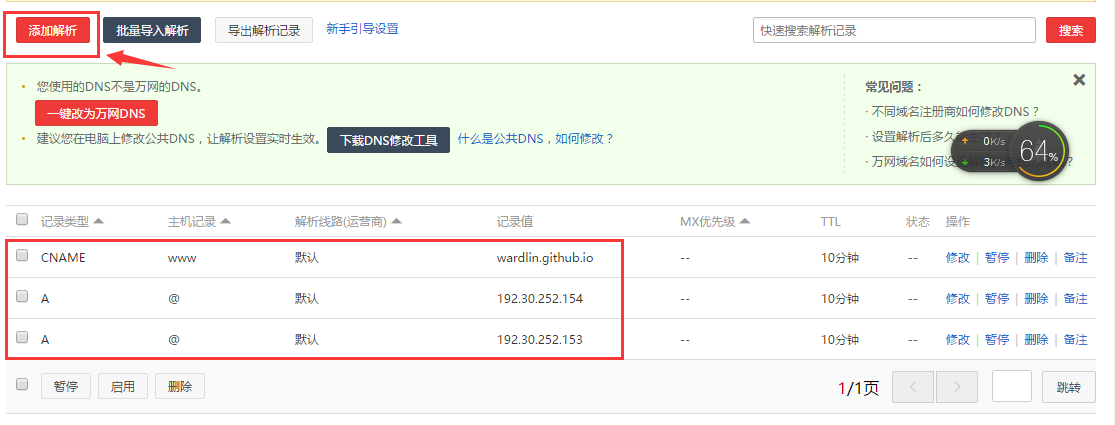
注册登录dnspod官网,同样的添加自己的域名,然后在域名下添加上面的三条解析记录
- 到阿里云上找到域名,点击’管理’,进行DNS修改,将DNS服务器修改为
- 访问域名
访问自己的私人域名,估计设置几分钟之后便能生效(访问username.github.io会跳转到购买的域名下)
使用next主题
下载next主题包
next主题下的_config.yml(blog/themes/next/_config.yml)文件统称为主题配置文件
在gitbash窗口中输入以下命令
$ cd your-hexo-site
$ git clone https://github.com/iissnan/hexo-theme-next themes/next
打开站点配置文件, 找到theme字段,并将其值更改为next
|
|
先用hexo clean清除缓存,再用下列命令验证next主题是否应用成功
$ hexo g
$ hexo s
此时即可使用浏览器访问 http://localhost:4000,检查站点是否正确运行。
选择Scheme
- Muse - 默认 Scheme,这是 NexT 最初的版本,黑白主调,大量留白
- Mist - Muse 的紧凑版本,整洁有序的单栏外观
- Pisces - 双栏 Scheme,小家碧玉似的清新
这是next主题提供的三种不同外观,我选择的是Mist风格外观
在主题配置文件下修改scheme
设置头像
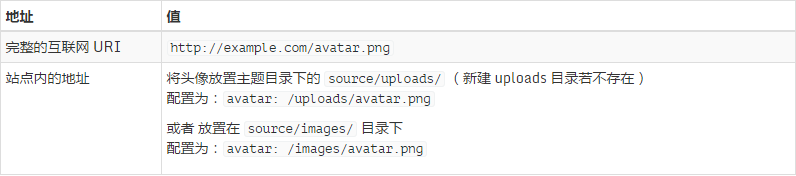
编辑主题配置文件,修改字段avatar,值设置成头像的链接地址。其中,头像的链接地址可以是:
添加「标签」页面
新建「标签」页面,并在菜单中显示「标签」链接。「标签」页面将展示站点的所有标签,若你的所有文章都未包含标签,此页面将是空的。 底下代码是一篇包含标签的文章的例子:
|
|
新建页面
在终端窗口下,定位到 Hexo 站点目录下。使用 hexo new page 新建一个页面,命名为 tags :$ cd your-hexo-site
$ hexo new page tags设置页面
编辑刚新建的页面,将页面的类型设置为 tags ,主题将自动为这个页面显示标签云。页面内容如下:1234title: 标签date: 2014-12-22 12:39:04type: "tags"---修改菜单
在菜单中添加链接。编辑 主题配置文件 , 添加 tags 到 menu 中,如下:1234menu:home: /archives: /archivestags: /tags详细说明可参考官方文档添加「标签」页面
添加「分类」页面
分类页面的添加与标签的方法相同,可参考官方文档添加「分类」页面
添加「音乐」功能
- 在网页版网易云音乐找到心仪歌曲的外链
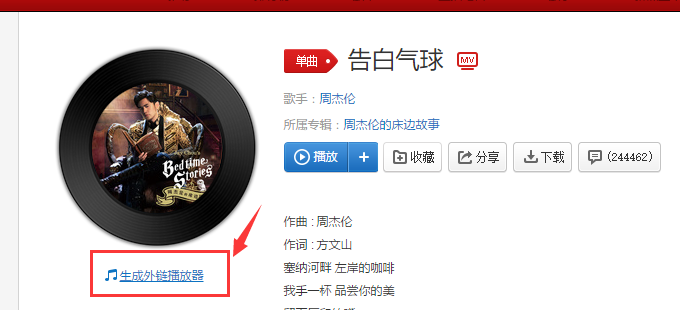
- 点击外链,复制其
HTML代码 - 在
theme/layout里找到侧边栏文件sidebar.swig,在endif之前加入上面的HTML代码
添加 社交链接
在侧边栏添加社交链接,需要在主题配置文件中设置链接和链接图标
链接
链接放置在social字段下,一行一个链接。其键值格式是显示文本: 链接地址12345678# Social linkssocial:GitHub: https://github.com/your-user-nameTwitter: https://twitter.com/your-user-name微博: http://weibo.com/your-user-name豆瓣: http://douban.com/people/your-user-name知乎: http://www.zhihu.com/people/your-user-name# 等等链接图片
设定链接的图标,对应的字段是social_icons。其键值格式是匹配键: Font Awesome 图标名称,匹配键与上一步所配置的链接的显示文本相同(大小写严格匹配),图标名称是 Font Awesome 图标的名字(不必带 fa- 前缀)。enable选项用于控制是否显示图标,你可以设置成false来去掉图标。1234567# Social Iconssocial_icons:enable: true# Icon MappingsGitHub: githubTwitter: twitter微博: weibo
添加「Local Search」页面(简单版)
- 安装 hexo-generator-searchdb
编辑
站点配置文件,添加以下字段:12345search:path: search.xmlfield: postformat: htmllimit: 10000编辑
主题配置文件,启用本地搜索123# Local searchlocal_search:enable: true
添加「Algolia搜索」页面
另一种搜索服务集成Algolia,因为之前广泛使用的Swiftype 站内搜索官方已经暂停了个人使用,只能通过企业注册使用。当然,Algolia也提供了很好的搜索服务,它是是一家致力于为用户提供毫秒级的数据库搜索服务的法国初创公司,其初衷是致力于让客户可以获得“100ms”等级的实时搜索服务。并且在next主题的5.1以上版本已经集成Algolia站内搜索功能,使用起来很便捷。
- 注册登录Algolia官网,我使用github账号登录
进入
Dashboard的Indices界面,点击NEW INDEX添加关键字INDEX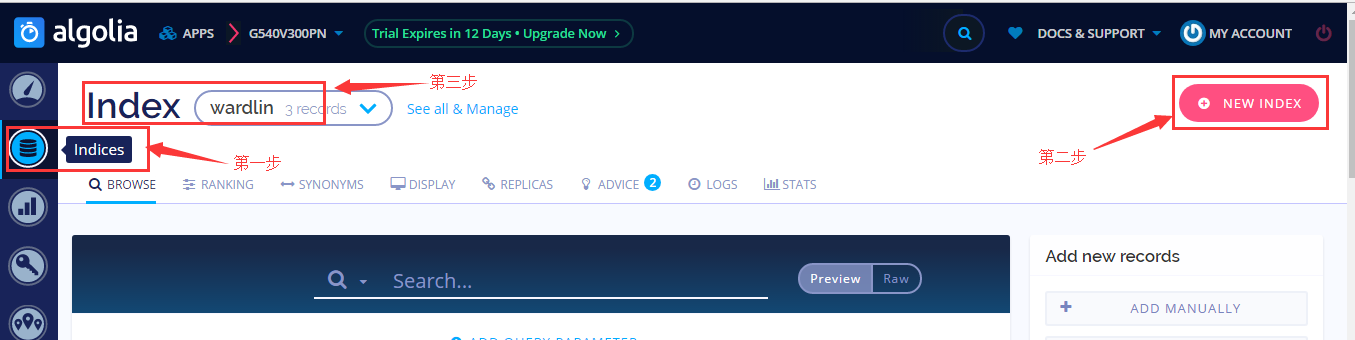
点击左侧
API Keys,可以获取到我们需要的信息(还有上面的INDEX)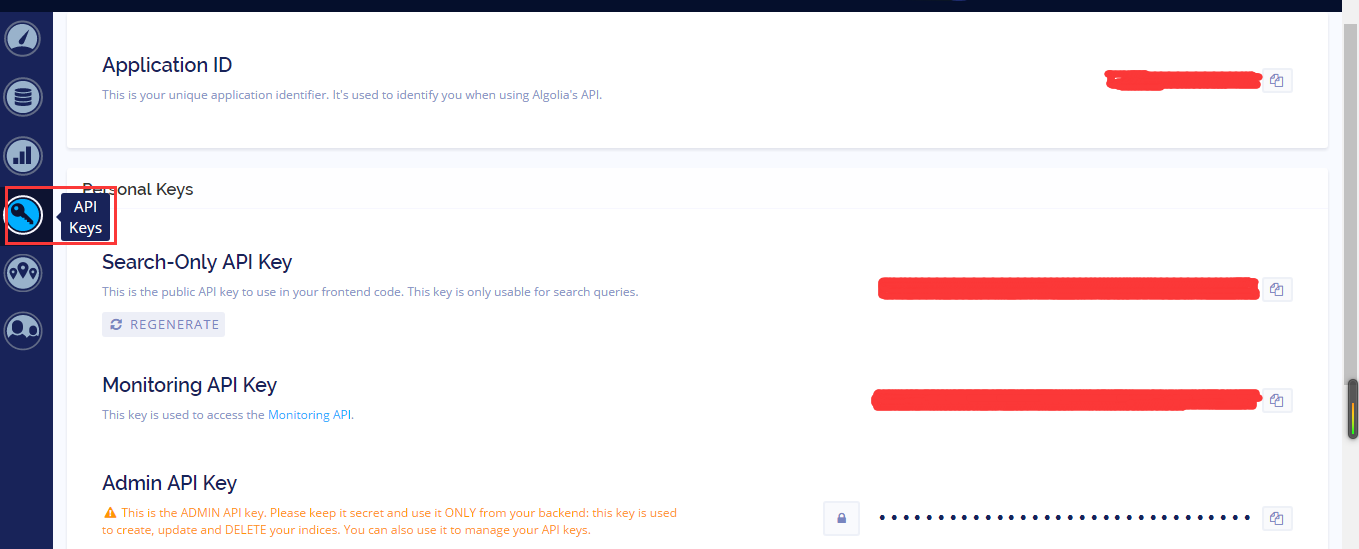
安装
hexo-algoliasearch插件并填写配置信息$ npm install hexo-algolia –save
在根目录的
站点配置文件中加入如下配置,注意改成前面algolia注册获得的数据1234567891011search: truealgolia:appId: 'appId'apiKey: 'apiKey'adminApiKey: 'adminApiKey'indexName: 'indexName'chunkSize: 5000fields:- title- slug- content:strip
在`主题配置文件``中加入以下配置
12algolia_search:enable: true接着gitbash窗口执行以下命令,确保数据上传到Algolia成功(不成功可以尝试先清除缓存
hexo clean)$ hexo algolia
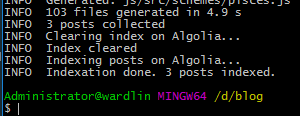
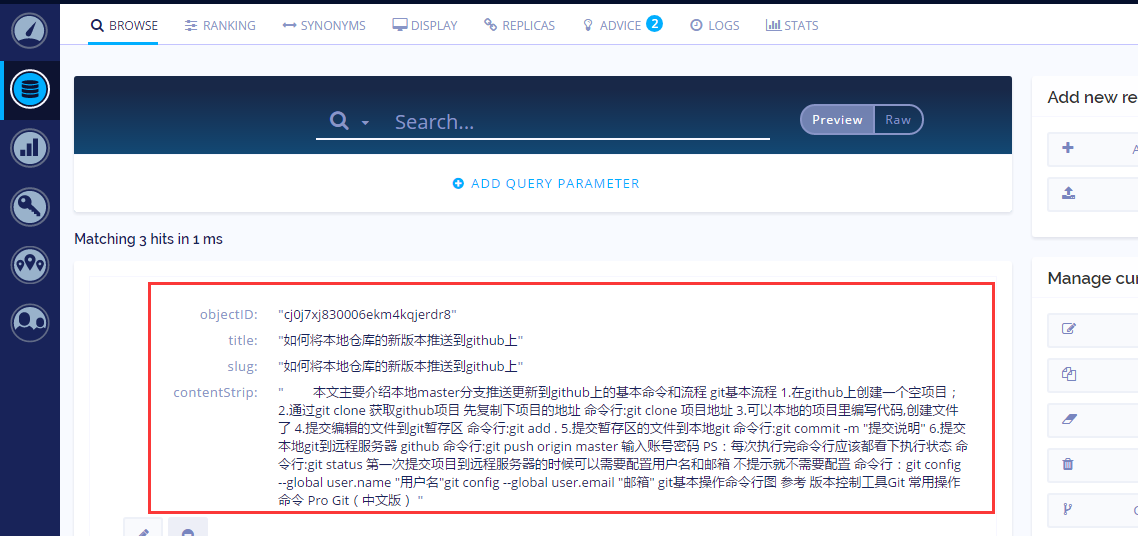
此时到Algolia官网上查看会有成功上传的网站信息
在theme中添加布局和样式文件
新建
algolia.swig(/themes/next/layout/_partials/search/algolia.swig)123456789101112131415161718192021<div class="site-search"><div class="algolia-popup popup"><div class="algolia-search"><div class="algolia-search-input-icon"><i class="fa fa-search"></i></div><div class="algolia-search-input" id="algolia-search-input"></div></div><div class="algolia-results"><div id="algolia-stats"></div><div id="algolia-hits"></div><div id="algolia-pagination" class="algolia-pagination"></div></div><span class="popup-btn-close"><i class="fa fa-times-circle"></i></span></div></div><script src="//cdn.bootcss.com/instantsearch.js/1.7.1/instantsearch.min.js"></script>在
search.swig(/themes/next/layout/_partials/search.swig)引入algolia.swig12{% elseif theme.algolia_search %}{% include 'search/algolia.swig' %}在要触发搜索的
HTML节点(/themes/next/layout/_partials/header.swig)加入一个CLASS名为popup-trigger(在line 56之后)12345678{% elseif config.search %}<a href="javascript:;" class="popup-trigger">{% elseif config.search || theme.algolia_search.enable %}<a href="javascript:;" class="popup-trigger">{% elseif theme.algolia_search %}<a href="#" class="popup-trigger">{{ __('menu.search') }}</a>修改
algolia-search.js文件(/themes/next/source/js/src/algolia-search.js),加入CONFIG对象12345678910var CONFIG = {root: '/',algolia: {applicationID: 'applicationID',apiKey: 'apiKey',indexName: 'indexName',hits: { "per_page": 10 },labels: { "input_placeholder": "Searching...", "hits_empty": "未发现与 「${query}」相关的内容", "hits_stats": "${hits} 条相关条目,使用了 ${time} 毫秒" }}};新建
search.css(/themes/next/source/css/search.css)样式文件123456789101112131415161718192021222324252627282930313233343536373839404142434445464748495051525354555657585960616263646566676869707172737475767778798081828384858687888990919293949596979899100101102103104105106107108109110111112113114115116117118119120121122123124125126127128129130131132133134135136137138139140141142143144145146147148149150151152153154155156157158159160161162163164165166167168169170171172173174175176177178179180181182183184185186187188189190191192193194195196197198199200201202203204205206207208209210211212213214215216217218219ul.search-result-list {padding-left: 0px;margin: 0px 5px 0px 8px;}p.search-result {border-bottom: 1px dashed #ccc;padding: 5px 0;}a.search-result-title {font-weight: bold;}a.search-result {border-bottom: transparent;display: block;white-space: nowrap;overflow: hidden;text-overflow: ellipsis;}.search-keyword {border-bottom: 1px dashed #4088b8;font-weight: bold;}#local-search-result {height: 90%;overflow: auto;}.popup {display: none;position: fixed;top: 10%;left: 50%;width: 700px;height: 80%;margin-left: -350px;padding: 3px 0 0 10px;background: #fff;color: #333;z-index: 9999;border-radius: 0px;}@media (max-width: 767px) {.popup {padding: 3px;top: 0;left: 0;margin: 0;width: 100%;height: 100%;border-radius: 0px;}}.popoverlay {display: none;position: fixed;width: 100%;height: 100%;top: 0px;left: 0px;z-index: 2080;background-color: rgba(0,0,0,0.3);}#local-search-input {margin-bottom: 10px;width: 50%;}.popup-btn-close {position: absolute;top: 6px;right: 14px;color: #4ebd79;font-size: 14px;font-weight: bold;text-transform: uppercase;cursor: pointer;}#no-result {position: absolute;left: 44%;top: 42%;color: #ccc;}.busuanzi-count:before {content: " ";float: left;width: 260px;min-height: 25px;}@media (min-width: 768px) and (max-width: 991px) {.busuanzi-count {width: auto;}.busuanzi-count:before {display: none;}}@media (max-width: 767px) {.busuanzi-count {width: auto;}.busuanzi-count:before {display: none;}}.site-uv,.site-pv,.page-pv {display: inline-block;}.site-uv .busuanzi-value,.site-pv .busuanzi-value,.page-pv .busuanzi-value {margin: 0 5px;}.site-uv {margin-right: 10px;}.site-uv::after {content: "|";padding-left: 10px;}.algolia-popup {overflow: hidden;padding: 0;}.algolia-popup .popup-btn-close {padding-left: 15px;border-left: 1px solid #eee;top: 10px;}.algolia-popup .popup-btn-close .fa {color: #999;font-size: 18px;}.algolia-popup .popup-btn-close:hover .fa {color: #222;}.algolia-search {padding: 10px 15px 5px;max-height: 50px;background: #f5f5f5;border-top-left-radius: 5px;border-top-right-radius: 5px;}.algolia-search-input-icon {display: inline-block;width: 20px;}.algolia-search-input-icon .fa {font-size: 18px;}.algolia-search-input {display: inline-block;width: calc(90% - 20px);}.algolia-search-input input {padding: 5px 0;width: 100%;outline: none;border: none;background: transparent;}.algolia-powered {float: right;}.algolia-powered img {display: inline-block;height: 18px;vertical-align: middle;}.algolia-results {position: relative;overflow: auto;padding: 10px 30px;height: calc(100% - 50px);}.algolia-results hr {margin: 10px 0;}.algolia-results .highlight {font-style: normal;margin: 0;padding: 0 2px;font-size: inherit;color: #f00;}.algolia-hits {margin-top: 20px;}.algolia-hit-item {margin: 15px 0;}.algolia-hit-item-link {display: block;border-bottom: 1px dashed #ccc;transition-duration: 0.2s;transition-timing-function: ease-in-out;transition-delay: 0s;}.algolia-pagination .pagination {margin-top: 40px;border-top: none;padding: 0;text-align: center;}.algolia-pagination .pagination-item {display: inline-block;}.algolia-pagination .page-number {border-top: none;}.algolia-pagination .page-number:hover {border-bottom: 1px solid #222;}.algolia-pagination .disabled-item {visibility: hidden;}.fa-search::before{color: #999999;}将上述
algolia-search.js和search.css文件引入footer.swig文件(/themes/next/layout/_partials/footer.swig)12<link href="{{ url_for(theme.css) }}/search.css" rel="stylesheet" type="text/css" /><script type="text/javascript" src="{{ url_for(theme.js) }}/src/algolia-search.js"></script>
此时重新生成静态文件在本地服务器运行,打开浏览器就可以看到想要的效果了
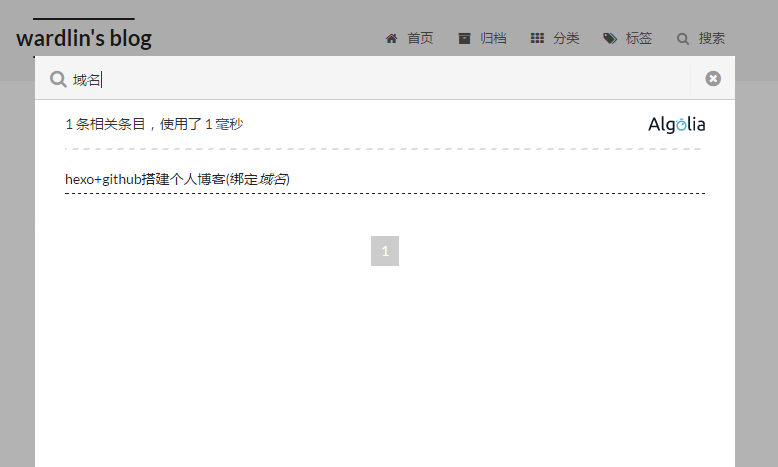
后记:
此时我们点击搜索出来的条目,链接却是undefined。
这时我们就需要查看algolia-search.js文件,其中标示了
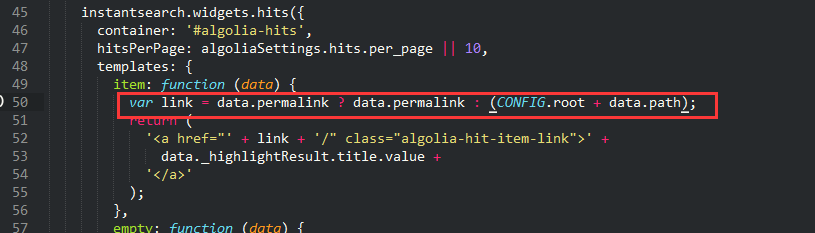
但是查阅Algolia官网的JSON ANSWER,并不包含permalink和path字段
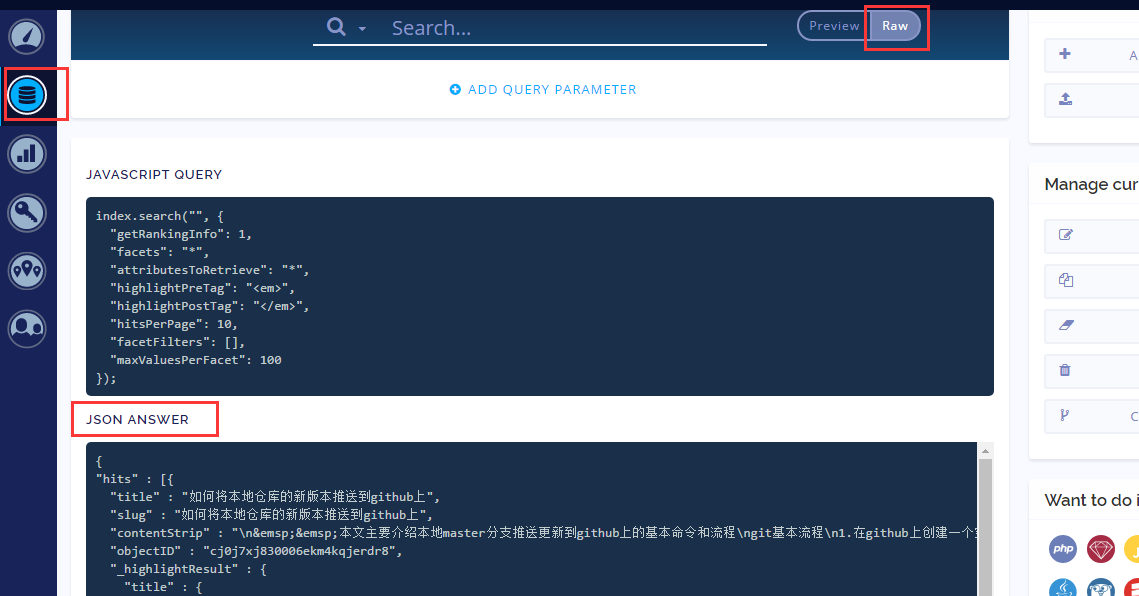
所以链接的值为undefined
解决方法:
algolia-search.js修改link参数如下1var link = data.permalink ? data.permalink : data.slug;站点配置文件修改permalink的格式为1permalink: :title/